Happy New Year! I can’t believe its 2012… especially because it’s now been a year since we were gathering paperwork to buy our apartment. Anyway, time for another DIY project post! I actually finished this one a few months ago, but never got around to photographing the finished result until now.
Since we don’t have kids yet (and don’t plan to for a couple more years), our second bedroom serves multiple purposes. It has an extra bed so it serves as a guest room, it has a desk and bookshelf so it serves as a study/computer room, and it has enough extra space to serve as my art studio. For it to be functional as a studio, I needed some sort of work surface. Something attractive enough to coordinate with the rest of the room, but cheap enough that I can destroy it with my work and not feel bad… Cheap + Pretty = DIY!
I got the idea to customize a work table from one of my FAVORITE blogs, Little Green Notebook. I used the same unfinished IKEA table top, but I used different IKEA table legs. Also, instead of painting the legs gold and painting the top whitewash, I left the legs as-is, and stained the wood top in dark brown.
Staining is actually a really fun and easy process. When I was younger, my parents bought most of my bedroom furniture from unfinished furniture shops. We’d lay down newspaper in the garage and stain and seal it together. I’d even attach the drawer pulls myself. This VIKA table top is actually much easier than my childhood furniture since its basically just a flat wood board.
The first step is prepping the wood. I propped the table top on two old paint cans and used the Ikea packaging as a drop cloth. Then I lightly sanded the surface to remove any splinters. After sanding, make sure that any saw dust is wiped off. Also make sure the wood is totally dry before painting on the stain. I used Minwax PolyShades Stain and Polyurethane in one. My original intention was to finish everything in one easy coat, but that’s not what happened – I’ll explain later…
When painting on the stain, always paint with the grain of the wood. It helps to paint your strokes backwards towards the areas you just painted. Usually I’d use a nicer brush for a project involving nicer furniture, but this table is meant to get messed up, so I used whatever cheap sponge brush I had lying around.
Unfortunately, the color turned out a little differently from what I was expecting. The swatch at Home Depot looked more like a neutral medium brown, but I ended up with something that’s more of a yellowy dark brown. I’m wondering if that’s because it’s made out of pine. My can of stain recommended using a wood conditioner for soft woods like pine, but like I said before, I don’t really care to be particularly careful or perfect with this project.
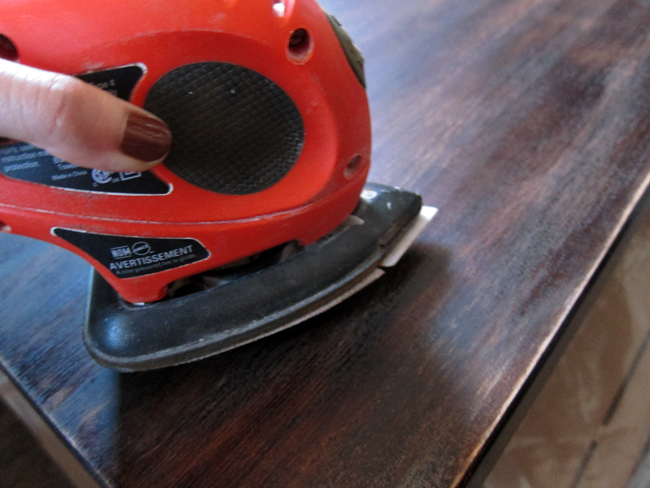
After giving my first coat a couple hours to dry, I decided that I should be able to make the color lighter by sanding it down and creating a rustic, distressed look. From here onward, I’m defeating the purpose of using a stain and sealer in one and I am creating more unnecessary work for myself. Normally, I would sand lightly after the first coat, use the Minwax Polyshades for a second coat and call it a day.
Go power sander, go!
Some heavy sanding seemed to really help with the color and had the added bonus of giving it a worn rustic look. But I didn’t like that my wood is once more exposed and porous. Luckily I had some extra Polyurethane sealer lying around from a previous project. I applied a nice coat of it once the saw dust was cleared away.
This stuff dries to touch pretty fast, but I gave it a couple days to dry just to be safe. Two days later I flipped the top over to attach the legs.
When it comes to Ikea furniture, there’s a brute force method to screwing anything into wood. They rarely pre-drill holes for you, but only give you a little dent to position the screw. The screw basically ends up driving itself in, boring its way through the wood as you twist.
And that’s it! Very easy if you pick the right color stain and don’t have to sand and re-seal. I was annoyed at first, but the darker color actually works well with the room. Its almost the same color as our desk and floor, so it definitely coordinates. Now I only need two more things for my studio area. I need an easel for painting and I plan to make a large linen covered pinboard to hang all of my swatches and inspirations (the one you see in the pic is just foam core propped up on the table).
Look carefully! There are clues in these pictures for current and future projects that I will be posting on the blog soon!


vera nice dear, as always 😉
LOOKS GREAT!!! i love the color! (even if it wasn’t the one you expected)
Beautiful work space! 🙂
we have the same table and legs! haven’t gotten around to staining it, but if we do, this is a handy tut 🙂
wow…I’d pay you for a toy chest for CJ.
http://www.bowerpowerblog.com/2012/01/toy-boxed/
Lovely new table! I’ve been meaning to switch out my old fold-out that I’ve been resigned to as a desk and this would be a great way to do that.