Follow Me on Pinterest follow us in feedly like us on facebook

Email Subscription

Enter your email address:

Delivered by FeedBurner


My New Baby: Fiddle Leaf Fig Tree

Other posts in this series: Part 2, Part 3

It was inevitable that I’d grow up to love plants. When I was a kid, my mom was constantly planting roses, peonies, and other flowers around the perimeter of the house. My dad also would spend whole days working on his garden, growing veggies, killing weeds, getting sun burned and engaging in epic battles against hungry bunnies. I suppose it influenced me a little? So it’s no wonder that despite living in a small apartment in the midst of much concrete, I must still find ways to garden (I mean, even a neighborhood called “Forest Hills” has much less green than what I grew up with in the suburbs.) My latest addition to my windowsill garden is my new fiddle leaf fig tree!

I’ve been obsessed with these trees for quite some time now. Their large expressive leaves just have so much character! And the many times they’ve been featured in design blogs only serves to reinforce my love.

My New Baby: Fiddle Leaf Fig Tree - << joeandcheryl.com >>

image via honestlywtf.com

Here’s my little guy when I bought it back in April.  It was tiny and arrived with only four leaves.

My New Baby: Fiddle Leaf Fig Tree - << joeandcheryl.com >>

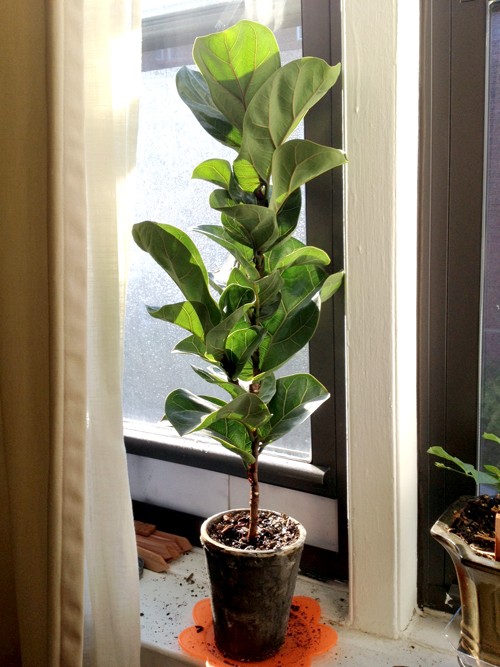
fiddle leaf fig on the right, jasmine plant on the left.

My New Baby: Fiddle Leaf Fig Tree - << joeandcheryl.com >>

This was my first time growing a fiddle leaf fig, so I made sure to do my homework.  They prefer bright morning light, so it would have been happy on an east facing window, but I have limited options when it comes to windows.  I ended up putting it on a south window (slightly south east, but mostly south), and it’s been quite happy there.

I also read that they are supposedly slow growing and do not tend to branch indoors unless pruned back.  So if you don’t just want one tall column of leaves, you have to cut it back to give it that full tree-like shape.  After reading this, I assumed I would not need to prune back until next growing season in a year.  However, this plant is NOT slow growing.  In a matter of two months it tripled in size!

My New Baby: Fiddle Leaf Fig Tree - << joeandcheryl.com >>

At this rate, I felt like I should prune sooner than later to encourage branching.  So 1.5 months ago, I chopped off the top bit which included two leaves.  And why settle for one plant when you can have two?

I decided to use this cutting to propagate a new tree. Cloning can be SO FUN! Propagated plants also make great affordable gifts. You just have to make sure you have a clean sterile cut, then dip the open wound into some rooting powder like this product.

The instructions on the container say the next step is to stick the cut end into some soil.  I’ve never had luck this way and prefer to start my roots in water and transfer to soil later.

My New Baby: Fiddle Leaf Fig Tree - << joeandcheryl.com >>

Then you just have to be patient and wait.  Don’t be discouraged!  It will look like nothing is happening for about a month.  Just make sure that the water never dries up from the cup.  In about a month, you could see the buds of new roots!

My New Baby: Fiddle Leaf Fig Tree - << joeandcheryl.com >>

I forgot to take pictures, but two weeks after the roots started (as of yesterday), the roots had all grown to a length of one to two inches.  I felt that it was ready to be transferred to soil. (**see below for updated progress on the propagated plant!)

My New Baby: Fiddle Leaf Fig Tree - << joeandcheryl.com >>

Oh, and the mama plant is doing great too!  The pruning really did work, and it is now growing two new branches!  Hopefully it will eventually get big enough that I can display it on the floor, rather than up on the windowsill.

My New Baby: Fiddle Leaf Fig Tree - << joeandcheryl.com >>

My New Baby: Fiddle Leaf Fig Tree - << joeandcheryl.com >>

Other tips:

They don’t like dry heat.  The soil should be dry to touch between watering.  Occasionally clean the dust off the leaves for maximum sun absorption. Fertilize from spring to autumn. But on the whole, its been a really easy plant to take care of.

On a side note, I’ve been obsessed with this book.  It has very whimsical descriptions of the personalities of various house plants, and describes the care and needs of those plants in a way that is easy to understand.  The photos are also very inspiring.

My New Baby: Fiddle Leaf Fig Tree - << joeandcheryl.com >>

And for your enjoyment, more great photos of fiddle leaf figs from around the blogosphere.

My New Baby: Fiddle Leaf Fig Tree - << joeandcheryl.com >>

image via honestlywtf.com

My New Baby: Fiddle Leaf Fig Tree - << joeandcheryl.com >>

image via gardenista.com

My New Baby: Fiddle Leaf Fig Tree - << joeandcheryl.com >>

image via style-files.com

My New Baby: Fiddle Leaf Fig Tree - << joeandcheryl.com >>

image via designsponge.com

My New Baby: Fiddle Leaf Fig Tree - << joeandcheryl.com >>

image via designsponge.com

My New Baby: Fiddle Leaf Fig Tree - << joeandcheryl.com >>

image via http://frenchbydesign.blogspot.com


**EDIT (7/22/13):  I checked on the propagated plant again a couple days ago, and the roots are really growing rapidly.  You can see how they are starting to fill the cup.  I’m sure I’ll have to transplant it in no time.  Hopefully once the roots are established, it will start to grow some new leaves.

My New Baby: Fiddle Leaf Fig Tree - << joeandcheryl.com >>


**UPDATE (9/4/13):The main plant is getting huge now!  Both new branches have grown substantially and the whole thing has gotten much taller.  I picked off some of the lower leaves to give it a more tree-like shape.  I think I may need to prune again soon for more branching, but I’ll probably wait until the spring during growing season.  I gave the little cutting away to a friend last month.  I didn’t take any pictures, but when I gave it away it has a thriving, established root system, and it had grown three or four new leaves.

My New Baby: Fiddle Leaf Fig Tree - << joeandcheryl.com >>

For more updates on the growth of my fiddle leaf fig, check out Part 2.


Gold Spray Painting My Old Alarm Clock

Gold Spray Painting My Old Alarm Clock - << joeandcheryl.com >>

Gold Spray Painting My Old Alarm Clock - << joeandcheryl.com >>

We have finally been getting around to decorating our master bedroom (the most neglected room in the apartment.) For the past two years, our mattress has been sitting on the floor. And with no night stands, my alarm clock and all bedside necessities have just been left on the floor next to the mattress.  Not exactly the most inspiring situation.  A few months ago, the bed frame I had been eying finally went on sale, and we had two night stands custom made.  So much decorating excitement to be had! I’ll definitely be getting around to showing more of that progress soon, but for now, here’s just a little tidbit.

Gold Spray Painting My Old Alarm Clock - << joeandcheryl.com >>

I’ve had this alarm clock since college… probably about 11 years.  I put absolutely no thought into it when I bought it.  It was just the cheapest radio alarm clock at the school store that day. Its ugly, and now that everything in the bedroom is coming together, it just did not fit in.  But with money being tight right now, buying a new alarm clock just for the sake of looks seems really unnecessary.  But spray paint can fix almost anything!

I’ve been obsessed with gold and black lately and I happened to have both types of spray paint in my closet, so those are the colors I went with.  Gold spray paint tends to have a more rosy pinkish tint to it.  If you want more of a yellow gold, I suggest going with the “brass” colored spray paint instead.

The important first step is to clean all surfaces thoroughly.

Gold Spray Painting My Old Alarm Clock - << joeandcheryl.com >>

I decided to paint the buttons before painting the body, so I masked them off.  In the photo you can see that I used washi tape.  I don’t prefer this. Washi tape doesn’t stick as well as masking tape. It also doesn’t conform to a rounded surface as well ask masking tape either. But I was too excited about my project and didn’t want to wait till I got a chance to buy masking tape, so I used what I had on hand. Then I spray painted black.

Gold Spray Painting My Old Alarm Clock - << joeandcheryl.com >>

Gold Spray Painting My Old Alarm Clock - << joeandcheryl.com >>

Next I masked off the rest of the alarm clock when the buttons had fully dried.  You should wait at least an hour, but I waited a few days for it to dry. And this time, I had real masking tape for the masking! I masked off every little button, dial, and even the power cord.

Gold Spray Painting My Old Alarm Clock - << joeandcheryl.com >>

Other than the washi tape thing, I believe in doing things the right way and not taking short cuts.  So when I do a painting project, I always prime my surface first.  With spray painting, I don’t mind using a clear top coat too, so that’s what I used.

Gold Spray Painting My Old Alarm Clock - << joeandcheryl.com >>

First I primed, using a big box as a spray booth.  Remember, spray paint has a way of getting EVERYWHERE! Keep it contained.

Gold Spray Painting My Old Alarm Clock - << joeandcheryl.com >>

I allowed that to dry for about an hour, made sure there were no dust particles stuck to it, then painted my first coat of gold. I found that the bundled up power cord made for a nice handle that allowed me to rotate the clock for spraying without messing up the painted areas.

Gold Spray Painting My Old Alarm Clock - << joeandcheryl.com >>

After another hour, I lightly buffed away any unevenness or dust globs with an extremely fine sanding sponge and cleaned away the dust.  I also slid over the little…what do you call it, setting slider?? so that gold paint could get under the other side during the second coat.

Gold Spray Painting My Old Alarm Clock - << joeandcheryl.com >>

Then I sprayed the second coat of gold paint.  After another hour, I sprayed a clear glossy top coat to give it a nice, shiny, smooth finish.

And here’s how it turned out!  Joe says he thinks it looks retro. It does kind of remind me of something from Star Trek the original series. Maybe someday I’ll spurge and get one of those fancy iphone alarm clock docks, but for now, I’m very happy with this. Hopefully I’ll update with more bedroom progress soon!

Gold Spray Painting My Old Alarm Clock - << joeandcheryl.com >>

Gold Spray Painting My Old Alarm Clock - << joeandcheryl.com >>

Gold Spray Painting My Old Alarm Clock - << joeandcheryl.com >>


Lets Make Things Clear: Leopard Prints vs. Cheetah Prints

Lets Make Things Clear: Leopard Prints vs. Cheetah Prints - >> joeandcheryl.com <<

This is kind of random, but I never thought the day would come that I would actually voluntarily buy something with a leopard print on it. I’ve always found it to be super tacky. But these days I’m totally loving it! Especially when its printed on calf hair. Very chic! Here are a few great products that have been majorly tempting me lately.

Lets Make Things Clear: Leopard Prints vs. Cheetah Prints - >> joeandcheryl.com <<

1. Coat by Emerson Fry
2. Jcrew clutch
3. Madewell Ballet Flats
4. Alexander Wang Marion Bag

One thing that’s been driving me crazy as I’ve been shopping around – designers never seem to know the difference between a leopard and cheetah. They almost always use these names interchangeably when naming their prints! As a print designer AND as an animal lover, this drives me absolutely nuts! Let’s clear things up a bit, shall we? The following photos and descriptions will hopefully give you a better idea of which is which (along with a couple other wild cats that I’ve seen in prints, but are never acknowledged!)

First, the cheetah. I’m definitely a cat lady, and cheetahs happen to be my favorite big cat. Their spots are solid black dots, evenly spaced. The Emerson Fry coat pictured above is a great example of a cheetah print! Although, I do think they took some liberties and made the ground color more white.

Lets Make Things Clear: Leopard Prints vs. Cheetah Prints - >> joeandcheryl.com <<

Leopards, on the other hand, have more complex spots. They tend to look like a black doughnut, horseshoe, or ring of dots. There is usually a brown spot in the center of the black ring. This pattern is probably the most common type of spotted cat used in prints for clothing and accessories. The Madewell shoes in the photo above are a great example of leopard!

Lets Make Things Clear: Leopard Prints vs. Cheetah Prints - >> joeandcheryl.com <<

I don’t think I’ve even seen a designer name their print after the jaguar, but I have definitely seen this animal used on prints before. Jaguar spots are very similar to leopard spots, but they tend to have a larger, more open ring of black spots. The brown spot in the middle is much larger than that of a leopard and contains a few smaller black spots in the middle.  Its sort of like a more complex leopard spot. Above, the Alexander Wang bag just might be a jaguar print!

Lets Make Things Clear: Leopard Prints vs. Cheetah Prints - >> joeandcheryl.com <<

And finally, another neglected spotted cat is the ocelot. I’m sure designers shy away from using this name since it is much less well known to the general public. Ocelots also have spots that are similar to leopards and jaguars, but theirs are much more elongated. They almost look like they are stretched out, or warped. Like conjoined leopard spots, or some sort of spot/stripe hybrid. Anyway, These are beautiful cats and I’m pretty sure that the Jcrew bag above features an ocelot print.

Lets Make Things Clear: Leopard Prints vs. Cheetah Prints - >> joeandcheryl.com <<

Well, hopefully this was educational. I could go into much more detail about differences in body build and behavior, but focusing on the spots is what is important in the fashion world.  At work I recently named one of my prints at work, “jaguar.” Hopefully it makes it into stores with that name intact!