
Other posts in this series: Part 2, Part 3, and Part 4
Over two and a half years ago, Joe and I moved into our apartment and made due with our less than perfect kitchen. We painted the cabinets so that I’d be able to hold out until we saved enough money to do a full renovation. Unfortunately, things don’t always go according to plan. Saving is a bit slower than expected and we decided that it might be more productive to save up for our next place (we are hoping this apartment is just our starter home) where we can really invest in what we really want. So the possibility for a better “future” is motivating me to hold out with a less than perfect “right now.” And having less is always the greatest inspiration for creative productivity. Like I always say, why settle for less when you can make whatever you want.
So onto more kitchen DIY’s! This is the first of a four part series of posts outlining more ways that I’m improving our kitchen. I’ll finish it all off with the grand reveal and lots of before and after shots. The first stop on our journey is how I resurfaced our laminate countertops.
This whole project was inspired by a blog post that I read on Little Green Notebook. Concrete countertops! Brilliant! Concrete is very stylish right now, and It definitely seems like the next best thing to stone… AND I was able to do it all for only around $30! This felt like a no-brainer to me.
Jenny from LGN gives great step by step instructions, and so does this other blog post that she links to. They tell you most of what you need to know, so I’ll be focusing on my own experiences and anything I did differently that might add to what they have already said. We all used a product called “Ardex Feather Finish.” It works like a dream and is designed to stick to almost any surface. Apparently they intend this product for use on floors and all of these blogs caution that countertops are not one of the recommended uses. But enough people seem to be having positive results with counters that I feel good about it. And anything durable enough for a floor must be OK as a work surface.
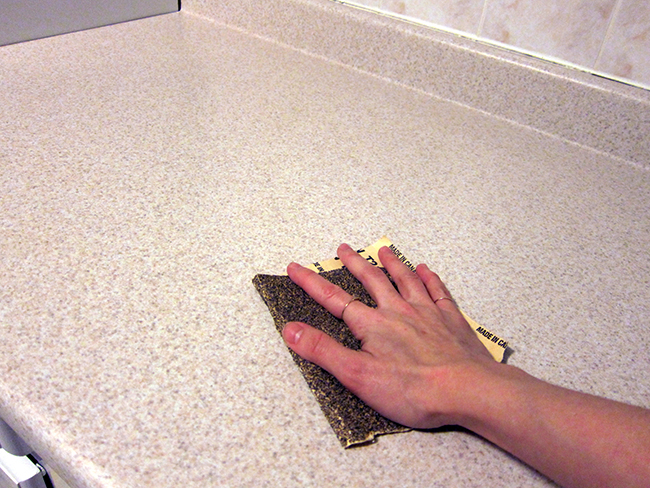
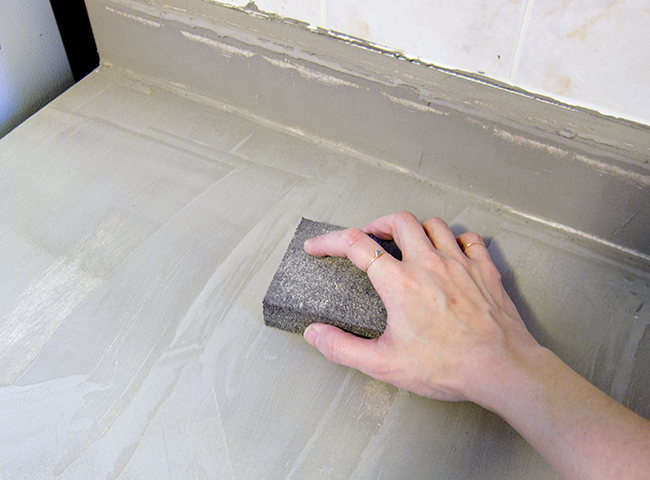
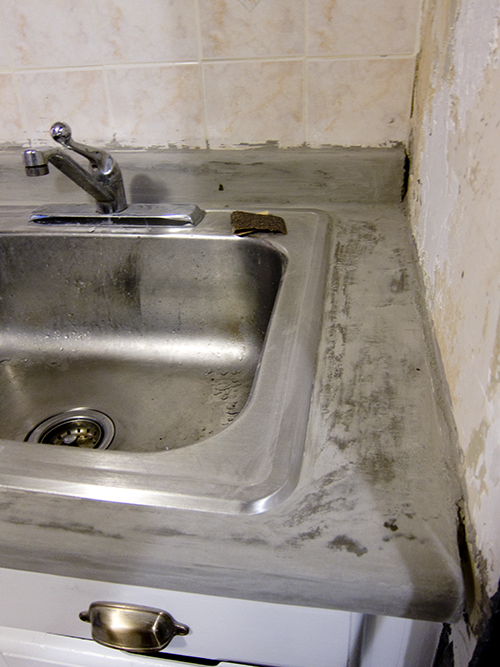
First Let’s take a look at what my countertops used to look like (below). They were a pinky-beige speckled formica that looked extremely out of date to me. The worst thing was that the section right next to the stove had yellowed over time – gross. I love cooking and prepare dinner almost every night so this was really starting to wear on me. Below you can see me prepping them for resurfacing by sanding and cleaning all surfaces. A strong degreasing cleaning agent is highly recommended for anything in the kitchen where there might have been oil splatter over the years.
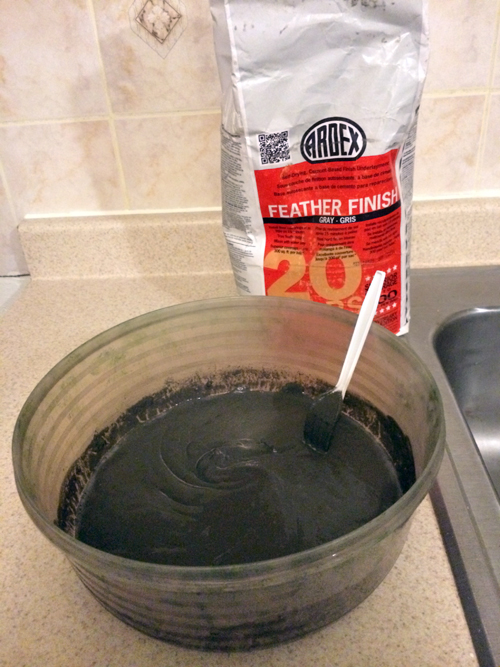
To prepare the cement, just add water. Jenny suggests adding enough water that the cement has the thickness of gravy. Then you let it sit for 10 minutes and mix again. At this point the consistency should feel a little more like peanut butter. BTW, peanut butter seems to be the key word for all of the kitchen projects I did. You’ll see in my next post how almost everything to be spread, spreads like peanut butter. IMPORTANT NOTE: please wear a mask for this whole project. There will be a lot of dust, and I’m pretty sure cement dust is really bad for the lungs.
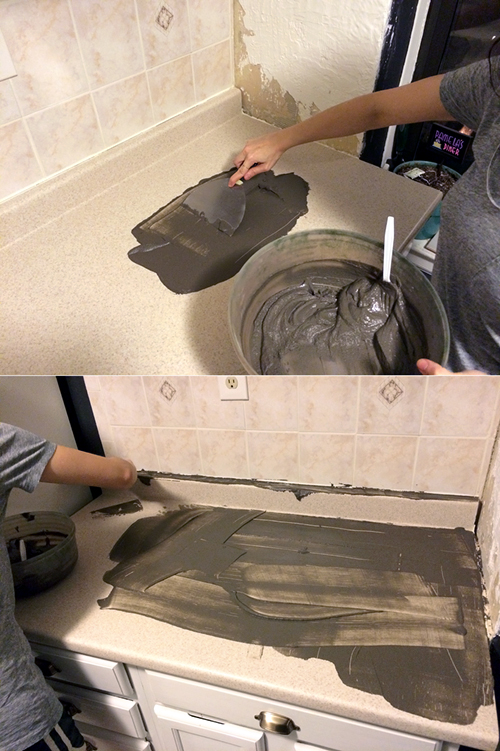
Spread a nice thin layer directly onto your countertops (just like peanut butter!). I used a 6 inch joint knife, but a concrete trowel would be great too. I recommend working in small sections. Its better to mix a little cement, do one continuous section of countertop, then mix more for the next continuous section. It takes about 5 hours for the cement to totally set up, but it hardens quickly and you’ll find it harder and harder to spread if you try to do everything all in one batch. It becomes almost clay-like rather quickly. We had two sections of countertop, so I did all my layers in two batches. Again, they should be CONTINUOUS sections. Don’t just do half a countertop. You’ll want to do 4 thin layers, sanding between each layer (I used a coarse grit sanding sponge).
I also found it very difficult to use the knife/trowel to apply the concrete to narrow or curved surfaces. In such areas, it was easiest to just use my fingers. I’d slather it on as if I was finger painting. It was much easier that way. But it did ruin my fingerprints for a good two weeks and could no longer use the fingerprint sensor on my iphone 5S (this stuff really does stick to everything)! Rubber gloves may be wise.
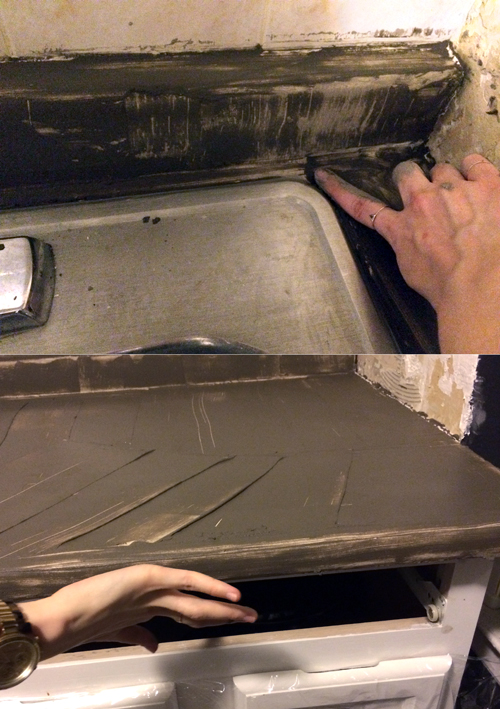
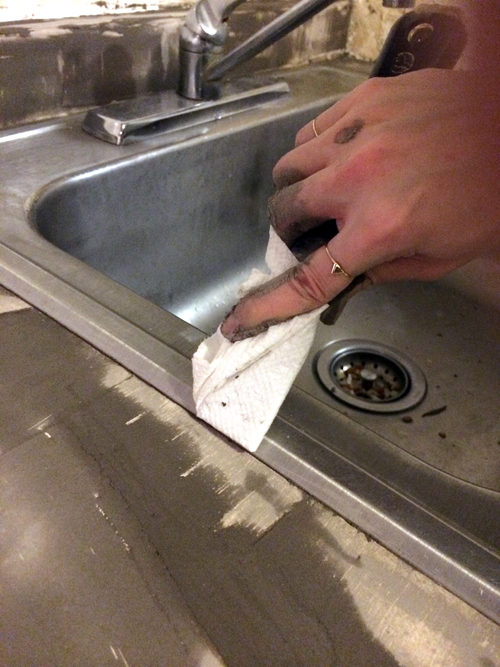
Another tricky spot was getting a clean edge around fixtures such as the sink. I found that the easiest thing was not to worry about getting in on the sink. I just came back with a rag wrapped around a putty knife and wiped it off for a nice clean edge (before it all dries of course).
I was also not very careful about keeping it clean against the walls. I was planning to re-tile the whole back splash, so I knew I’d just be covering up these messy spots. If you are wondering, we decided to keep things simple and just tile right on top of the old tile against the back wall. But we removed all the tile on the side wall where you’d be able to see the thickness of the back splash. You should do any tile removal BEFORE starting on the concrete countertops. If you are not re-tiling, then clean the edges the same way I did with the sink.
Your first layer will look a bit like this with the countertops still showing through in spots. It may show even more after you sand it down a bit, but that’s totally OK. Each additional layer will go on much more easily and fully.
Here are a few notes on layering that the the other blogs didn’t mention. I timed it and each layer takes about 5 hours to dry fully (depending on the temperature in the room and how thickly you lay it down.) So plan out your days accordingly. This whole thing will take at least two days to finish just because of drying time. Also, The layers seem to be what actually create the stony look of the concrete. My first layer went on looking like a very flat grey, but each additional layer seem to create more lights and darks for that stone-like look. The lights and darks seem to be determined by the direction of my trowel marks, the thickness of my layers, and the wetness of the concrete when applied. For this reason, I recommend varying the direction of your trowel marks on each layer to keep it more natural looking.
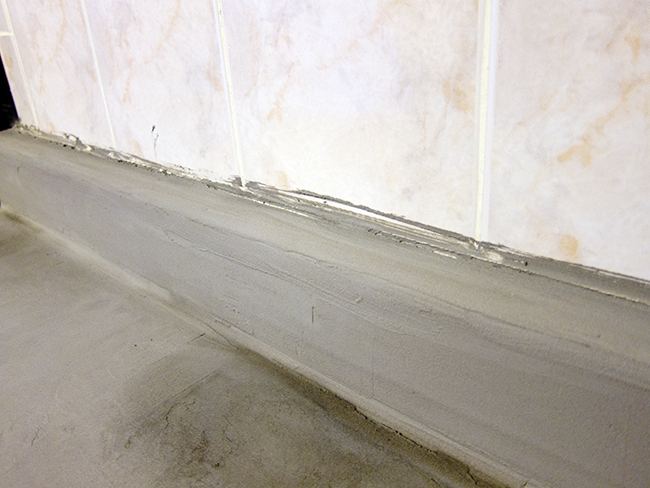
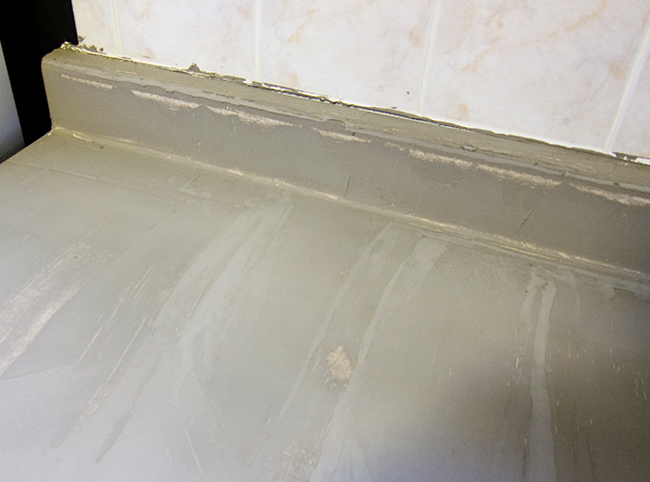
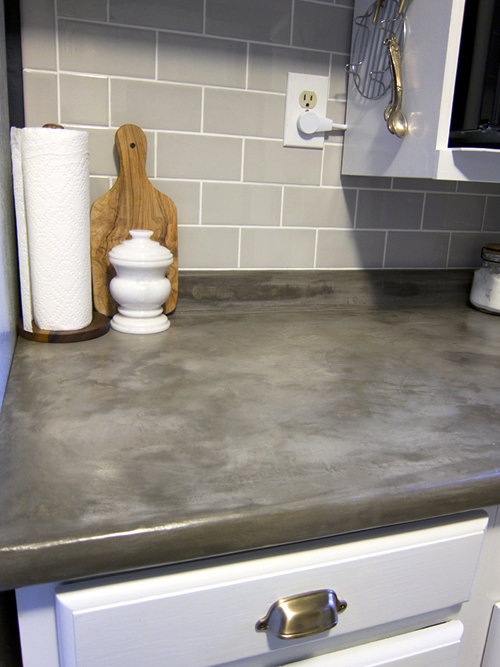
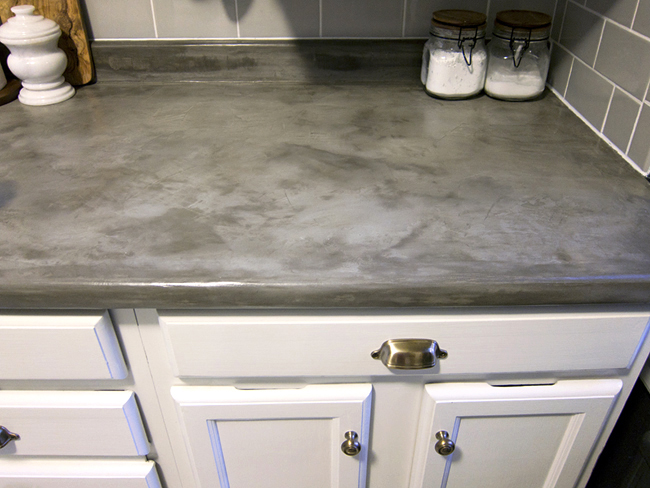
Here’s what the concrete looked like after all four layers had dried. Check out that beautiful texture! (note the tiles removed from the right side wall, but not the back wall)
Now, give the whole thing a really good sanding to your desired texture. You can go super smooth, or leave some trowel texture for a more organic look. I chose to go somewhere in the middle. mostly smooth with a little texture remaining. I really wanted a polished concrete look.
At this point the concrete will still be porous and it will be prone to staining and damage, so you’ll want to seal it somehow. Jenny from LGN used a lighter sealer that still allows some moisture to get through in favor of keeping the lighter color of the unfinished concrete. I chose to use a stronger, more permanent, water-tight, satin finish sealer since a kitchen counter would encounter a bit more abuse. Plus it would give me more of that polished concrete look that I want. You can use an acrylic concrete sealer to do this, but it was only sold in gallon sizes at my local hardware store and that was WAY more than I could ever use. So I decided to use a quart sized satin finish polyurethane sealer instead. The guy at the hardware store said it should work just as well.
EDIT 7/10/2014: For those considering this project, I’ve discovered that polyurethane will yellow over time. The more layers you use, the more it will yellow. I regret not using a genuine acrylic concrete sealer. I’ve also recently discovered this food-safe concrete sealer (also via LGN). It’s a little more expensive, but may be worth the investment. I will definitely use this for future projects!
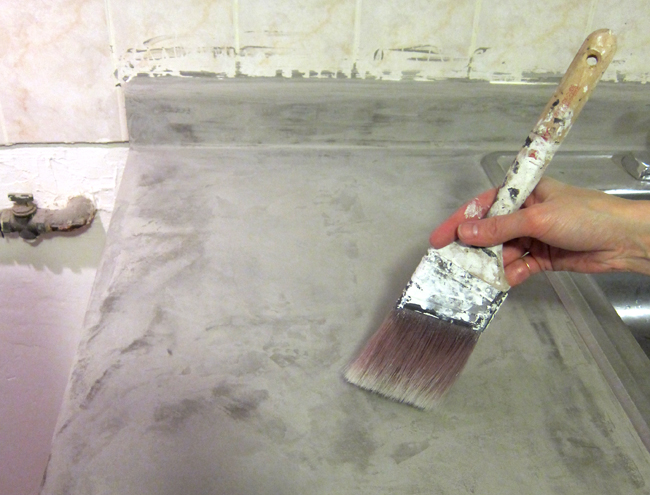
Before applying sealer, make sure to clean off any dust left behind by sanding. I used a dry paint brush to sweep everything off and then finished off by wiping it down with a rag. Make sure it is all totally dry before applying the sealer.
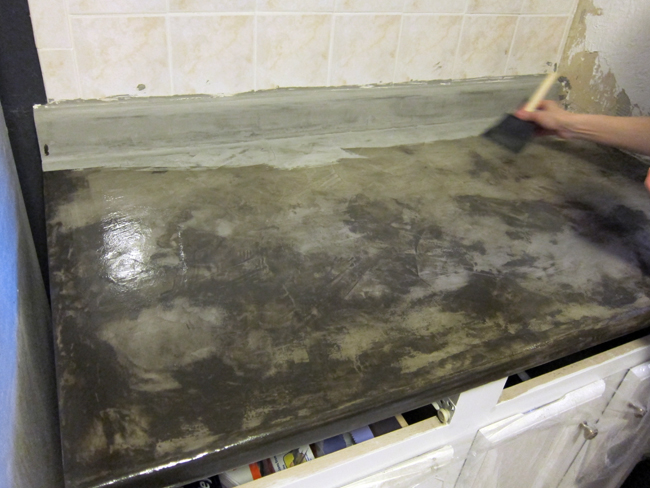
I applied it in two coats and sanded after the first coat dried for an extra smooth finish. Notice the color difference between the painted and unpainted sections. Once everything dries, the color will look somewhere between those two colors. Also, if you are using satin finish sealer, it will dry looking much less shiny than when it’s wet. I love how the sealer really brings out that stony coloring!
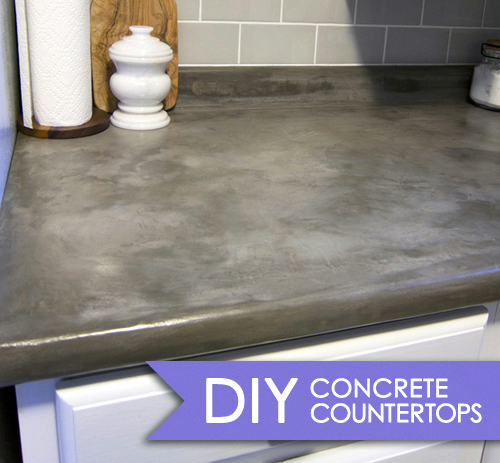
And here are the finished countertops! What an improvement! If you ask me, it looks way more expensive than other resurfacing techniques even though it was dirt cheap! I love the stylish industrial look. Stay tuned for the full before and after reveal where you’ll get to see them in the context of the whole kitchen.

Whoa! I love how that looks! Almost like a watercolor marble effect! Does that even make sense…? You’re amazing nonetheless!
The finished product looks amazing! I never thought a design could be brought together that way!
-Rocko Barbieri
Great job !! Thanks for making our kitchen more beautiful !
amazing!
So how are the countertops holding up now that you’re using them daily? Any report?
hi Katie! thanks for asking! We’ve been living with the new countertops for about a month and a half now, and they’ve been holding up great! I have even pounded out meat for chicken marsala on them (on a cutting board on top of the counters) and they suffered absolutely no damage. Also, it doesnt scratch easily, but pressure from a sharp knife will create a scratch or gouge. This is not something that will likely happen unless you are cutting food driectly on top of the surface, so just avoid doing that and always use a cutting board. But scratches are pretty easy to fix just by touching up with some polyurethane. Since the surface is irregular anyway, you don’t even notice it (i had one small scratch i had to patch up). The biggest danger with scratches is that moisture will seep in if the scratch cuts below the layer of sealer. Other than that, I’ve had no problems with it =)
Hi! I was wondering if you could share the name of the polyurethane you chose for sealing. I’ve been doing test boards and I tried some tilelab sealer the previous owners left in the basement, but I don’t think it looks very shiny at all. Also, it doesn’t looks like it’s really sealed… Yours look like they have the perfect amount of shine. How is it with stains and fingerprints?
hi Hailey! great questions! I used the satin finish polyurethane by MINWAX. It seals wonderfully. You won’t see any liquid absorption once the two layers are applied. You’ll know there’s liquid absorption when you see a darkening of the concrete when it makes contact with liquid. And since the polyurethane creates such a good seal, you’ll see absolutely NO staining or darkening. Although, I have not yet exposed my counters to dyes, red beets, yellow curry, or other highly pigmented substances… but all the regular stuff wipes off just fine. Also, for fingerprinting, I think the satin finish helps with that. Its just enough shine, but it not so glossy that you’ll ever see a fingerprint.
I can’t say enough how happy I am with my counters in the two months that I’ve had them. I get tons of compliments from friends and they are very functional and low maintenance. Again, so far the only problem has been occasional tiny scratches where you see liquid absorbing, but you just touch that up with more sealer (but only after the moisture dries)
Did you use oil or water based polyurethane?
oil based! here’s the product image
http://www.homedepot.com/catalog/productImages/400/fb/fbcfca0c-57a2-4bd0-a70a-2b7e92bce353_400.jpg
Thanks!! Just put the first coat down!
Hi Cheryl,
I am planning on doing this in my bathroom and kitchen. I love the look! Where did you buy the Ardex Feather Finish? I can’t seem to find it at Home Depot or Lowes.
This is a pretty specialized product and Home Depot and Lowes do not sell this product. The best way to find a retailer is to call the Ardex customer service listed on their website (http://www.ardexamericas.com/). They are very helpful and will be happy to provide you with a list of local retailers. I was lazy though and just bought my bag on ebay!
Getting very close to doing this in my kitchen. I love the way your counters turned out and really enjoy the difference in color and texture you achieved in your ardex counters. I like the way yours turned out better than most ardex counters I’ve seen. Would you mind commenting on the troweling techniques you used while applying your ardex? It looks as though, from the pics I can see, the first coat went on pretty straight forward front to back style. Did you mix that up for second and third coats? I.e. Go different directions for a more artistic look? Hope I’m making sense there. I was lucky enough to find an Ardex dealer in my hometown and I’ve got a couple of bags just dyin to become great cabinets lol. Great job on yours and thanks for the tut. 🙂
Thanks so much for your kind words!! for troweling, I actually started from back to front (for fear of leaning on the counter and messing up what I just did). And yes, each layer I tried to change up the direction of my trowel marks. Mostly I’d work in diagonals, but always at different angles. I think that helps contribute to the organic look of the lights and darks.
You guys are quick! Has it really been that long since we’ve seen each other?! The Countertop looks Fabulous!!! You are truly a Wonder Cheryl!
Thanks for the great tutorial Cheryl! My wife and I are itching to try this in our kitchen as well. I was wondering if you would give us another update on how they are holding up. Any stains from acidic food/drinks? Large chips or cracks? Have you had to reseal them?
Also, do you know if the sealer you used is food safe?
Thanks!
hi Nick!! I’d love to update you on the countertops. Up to this point they have been holding up GREAT! no chips or cracks. Also, I’ve prepared lemons, vinegar, and red beets on top of them and no staining at all (as long as the sealer is intact).
However, I have one regretful little spot where I was sloppy with a knife and gouged a little hole through the seal. This alone was no big deal and would have been super easy to re-seal with a spot of sealer. however, before I got around to it, I spilled some oil on the same spot and ended up with an oil stain that seeped into the little knik. That turned out to be a small dime sized dark spot. But I would say as long as the sealer remains intact, you should have no problems.
Also, I have noticed very slight yellowing in the polyurethane sealer. nothing major, and I think this is pretty normal for polyurethane… But I can’t help but wonder if concrete sealer would have maintained its color better. That will have to be an experiment for me in the future.
in terms of being food safe, I’m not sure, but I never prepare food directly on the coutertops. Even if it is food safe (which i don’t think it is) I would not recommend preparing food directly on top of the counters. It may be too damaging. I always have a plate or a cutting board between the counters and my food. But polyurethane is a standard sealer for most wooden furniture and tables.
Anyway, Let me know what you decide to do! I’d love to see how it works out for you =)
I’m finally doing it! I’m in the final sanding process right now and blogging as I go. Based on what you told me about troweling different directions to get the texture I’m loving all the texture going on, I even smeared some extra on here and there at the end on the last coat. I’m so loving my counter and I’m not even done yet! Lol. Thanks for the great tut and for answering my question. 🙂
awesome! can’t wait to see how it turns out!
We are about to embark on this countertop redo journey and I was wondering how long you waited between coats of poly?? Just until the coat dried, or did you let it “cure” over 24hrs / 48hrs??
Great tutorial, BTW
Hi Reagan! For the sealer, I just let it dry to touch before applying the next coat. I let it fully cure after all coats were applied, before really using the counters.
The couters turned out better than I could imagine! They look great, are sealed and ready to go! One question though… What do you use to clean them? I want to be sure I don’t harm the poly or concrete. Thanks again for your help!
I just use regular multi surface cleaner. It hasn’t caused any problems for me so far!
I love the look of the countertops but was wondering if the color could be lightened up or will they have to be dark gray?
hi Stacy! thanks for asking!! I believe you can add a powdered concrete/plaster tint to your concrete mixture for other color options. I’ve never tried it, but they sell a white tinting powder on Amazon that would probably lighten up the color!
http://www.amazon.com/Powdered-Concrete-Cement-Mortar-Plaster/dp/B00OYJ0Y22/ref=sr_1_13?ie=UTF8&qid=1416689724&sr=8-13&keywords=Powdered+Color+for+Concrete%2C+Plaster%2C+Cement+white
This is really nice post you have shared with us.Keep Blogging.
Thanks
Countertop Refinishing
Hi Cheryl and greetings from London, UK.
I was really interested to read your blog and just wondering if you can give me an honest update on how the countertops are holding up as I am trying to persuade my other half that this could work for us! thanks for great blog post.
Ally
I’d be happy to give you an honest update Ally! I think I mentioned this in an update in the post and on some of the comments above, but my only complaint to this point is that the polyurethane yellows over time. So do not use polyurethane! My plan is to sand away the current sealer and slap another two or three coats of the Ardex on top to make it look more grey again. You can pretty much layer this stuff forever if you wanted. I haven’t gotten around to it, but I plan to use this concrete sealer which should be food safe, and as far as I can tell, will not yellow. I’ll be sure to update about that once I get around to it. Here’s a link to the product http://www.amazon.com/Cheng-Concrete-Sealer-500-Ml/dp/B003YM7RRK/ref=pd_sim_hi_3?ie=UTF8&refRID=03QE8TTNZ2C36XMWWYV6
As far as how its held up physically, its been amazingly tough! there’s been the occasional fine scratch that I’ve had to re-seal, but no cracking or chipping what so ever. And I cook dinner almost every day, so I know its been getting proper use.
Henry feather finish made by same como am as ardex and is exact same thing is sold at Home Depot also both sold on amazon. Cheaper in store though. Looks great! 🙂
Also ardex comes in gray and white. If you don’t want those colors you are right, you can buy the powder and Ardex claims it works well with the product.
Does the top toletate heat very well?
Good question Kaye! It does tolerate heat quite well. I’ve taken a boiling kettle off the stove and set it directly onto the countertop with no problems at all.
I noticed on another blog that a woman tried this same product on her countertops and it ended up showing a ton of scratches that she didn’t mind but I wondered if you noticed the same problem?
This the blog post I am referring to so you can see the “scratches” that I am talking about.
http://www.sarahsbigidea.com/2014/01/to-faux-crete-or-not-to-faux-crete/
I really want to do this to my ugly country blue laminate counters but I am afraid to pull the trigger on it!
hi Tanya!! I have not noticed this problem at all, but it might have something to do with the type of sealer she used. I did not read her blog entry very carefully, but from the photos, it appears that she used a high gloss sealer to finish her countertops. Glossiness will always show everything. I used a matte finish sealer which hides imperfections much more easily. it is possible that I have scratches too, but I simply can not see them because of the matte finish.
Hi! Love this so much. I have read many of the blogs, and am all set to start my kitchen countertops. The only thing I am still waffling about is “do I seal AND topcoat, or just seal?” After reading yours, it sounds like maybe I should just use the food safe sealer you suggest. Reading Sarah’s made me worry about scratches, but after reading yours, I am much less worried about that! Did you find anyone who had actually used the food safe sealer?
Thanks for your help!
hi Kathleen!! Here’s the blog where I found out about the food safe sealer! She seems to be pretty happy with it =)
http://littlegreennotebook.blogspot.com/2014/06/black-concrete-countertops.html
personally, I wouldn’t want to use top coat because of the increased shine. shine always equals noticeable imperfections.
[…] Major diy’s in the kitchen: part 1 – countertop […]
Can you add a stain to it to make it a different color?
[…] DIY Review – Joe & Cheryl: Looking for an honest review, with straightforward tips and advice about a DIY concrete countertop? Then this is the blog post you need to read. […]
Your counters look so marvelous!! I’m definitely going to be trying this. I noticed you had said not to use the polyurethane because of the yellowing.Have you used the concrete sealer yet? If so how was the application process? Also I do know that rustoleum makes a poly that is a none yellowing product, as well as a Varathane none yellowing. Maybe one of those products might work. I’d love to hear what you think.
im doing this on my bathroom counter as I type. I have Thompsons Water Seal already in my paint cabinet. Any reason I could not use that to seal? It says on the can it can be used on concrete. Just wondering. Thank you. Btw…. Your counter look amazing!
I finally went for it and did this almost two weeks ago in my bathroom. I am in LOVE. My only issue is that the cat, kids, or husband seem to have scratched the surface! It’s pretty easy to scratch up now that I notice. Will an extra layer of sealer fix the scratches, or should I do another Ardex layer and then reseal?
How did you do the backsplash? I noticed you had not removed the old one when you were updating the countertop. We have a backsplash that I’d like to update when I do the cement countertops! Any tips you have will be greatly appreciated!
Hi there. I LOVE this idea. What about intentional color tints. Any stain type suggestions. Maybe the mentioned curry or beet juice or even blueberries might work. Or, are there stains to buy that are for that purpose?
Is it possible to color the concrete during the installation? I know it could be painted afterward, but I was thinking of a swirling (like clouds or water) look.
Can’t find feather finish what can I substitute?
Beautiful. Great job with the instructions, also. I am definitely going to do this in my kitchen. I love the grey stone look.
I love this idea but I’m concerned about the scratching. I there a sealer on the market that is hard enough to prevent this?
Hi! We love the color of your counter tops! Not all look like yours! Did you paint them after the cement dryer?